1.1. Create the VM
- Launch Virtualbox
- Click 'New'
- Complete 'Name and operating system' form
| Name: |
Arch |
| Type: |
Linux |
| Version: |
Arch Linux (64-bit) |
- Complete 'Memory size' form
| Set memory slider: |
4096 Mb |
- Complete 'Hard disk' form
| Check radio button: |
Create a virtual hard disk now |
- Complete 'Hard disk file type' form
| Check radio button: |
VDI (Virtualbox Disk Image) |
- Complete 'Storage on physical hard disk' form
| Check radio button: |
Dynamically allocated |
- Complete 'File location and size' form
| Folder name: |
Arch |
| Set disk size slider: |
30 Gb |
A new VM should be now created in Virtualbox
1.2. Configure the VM
- Select the new Arch VM
- Click 'Settings'
- Click on tab 'System'; set the following settings
| Check box: |
Enable EFI (Special OSes only) |
- Click on tab 'Display'; set the following settings
| Set video memory slider: |
128 Mb |
| Check box: |
Enable 3D acceleration |
- Click on tab 'Storage'; set the following settings
| Controller: IDE: |
mount Arch Linux iso |
The VM is now ready to boot the live media
- Select Arch VM and click 'Start'
- Select 'Arch Linux archiso x86_64 UEFI USB'
Screen will blank out for a couple of minutes followed by a series of startup events.
Eventually, the system will boot into console with the prompt
root@archiso ~ #
- Verify that Arch booted in UEFI mode
# ls /sys/firmware/efi/efivars
- Verify that the internet connection is working
# ping archlinux.org -c 4
- Update the system clock
# timedatectl set-ntp true
# timedatectl status
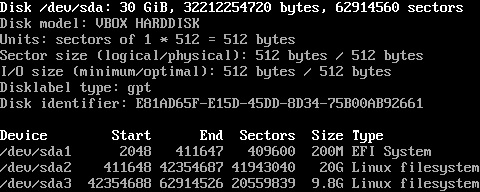
5.1. Format the partitions
- Format the boot partition as FAT32 file system
# mkfs.vfat -F 32 /dev/sda1
- Format root and home partitions as ext4 file system
# mkfs.ext4 /dev/sda2
# mkfs.ext4 /dev/sda3
5.2. Mount the partitions
- Mount the root partition to /mnt
# mount /dev/sda2 /mnt
- Create mount points for the boot and home partitions
# mkdir /mnt/boot /mnt/home
- Mount the partitions to their respective mount points
# mount /dev/sda1 /mnt/boot
# mount /dev/sda3 /mnt/home
- Verify partitions have been properly mounted
# findmnt
- Install reflector
# pacman -Sy reflector
- Backup the current mirror list
# cp /etc/pacman.d/mirrorlist /etc/pacman.d/mirrorlist.bak
- Sort mirror list using reflector
# reflector -l 100 --sort rate --save /etc/pacman.d/mirrorlist
The system is now ready to install Arch Linux proper
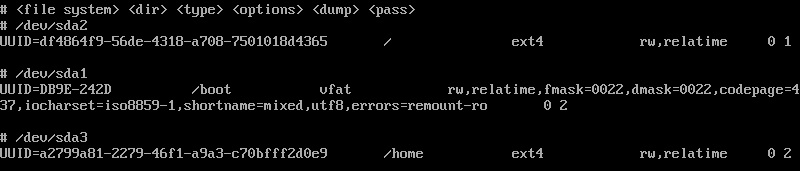
8.1. Generate the fstab file
- Generate fstab
# genfstab -U /mnt >> /mnt/etc/fstab
- Verify the contents of fstab
# cat /mnt/etc/fstab | less
8.2. Change root to /mnt
# arch-chroot /mnt
Console prompt will change to
[root@archiso /]
8.3. Configure system time
8.4. Configure the locale
8.5. Configure the network
8.6. Set root password
# passwd
9.1. Setup rEFInd
- Install rEFInd
# pacman -S refind-efi
- Install the rEFInd boot manager
# refind-install --usedefault /dev/sda1
- Configure rEFInd to pass kernel parameters
# mkrlconf
According to the rEFInd page on ArchWiki, when refind-install is run in chroot (step 8.2.),
refind_linux.conf will be populated with kernel options from the live system.
Hence, refind_linux.conf needs to be edited.
- Find UUID of root partition (/dev/sda2)
# blkid
- Edit refind_linux.conf
# nano /boot/refind_linux.conf
9.2. Enable microcode updates